1 Getting Started
[hide]
Start by assigning views to the three RGB channels. ChannelDesigner pre-assigns inputs using this order:
- If a process instance exists, the saved values—including images—are restored. If only saved settings exist, those settings are restored.
- Otherwise, the script searches for postfixes such as _R, _G, _B, _S, _H, _O and maps views accordingly.
- If nothing matches, the first available image is loaded into all channels. If no image is found, the script stops.
Note: Only main views are considered.
Hover a channel’s drop-down to see a compact preview and details. Inputs may be single-channel or multi-channel images; when a multi-channel image is used, only the corresponding channel is sampled. The live preview updates immediately when you change per-channel weights.
You can create an instance of the script with stored values, including images. If you only want to store the parameters, you can save them when exiting with the STOP button. To reset the parameters to their default values, simply press the tool button on the left side.
2 Adding More Channels
[hide]
If you work with additional filters (e.g., R, G, B, SII, Hα, OIII), you can append extra channel sets (each set contains three channels) via the radio button at the top.
When you only have a single additional filter (e.g., Hα), use it for all three slots in a set and set the unused weights to zero. For example, place Hα in the Red slot and set the Green and Blue weights to zero. A small tool button beside the sliders helps with “reset” and “do not use”.
By combining multiple sets with different weights you can blend RGB stars with narrowband starless data, add narrowband detail to RGB, or create palettes such as HOO or Foraxx (see the screenshot). Once you like a palette, store it by creating a new process instance.
3 Assigning Channels to Views
[hide]
To cycle through different filter combinations quickly, adjust the filter order at the top of the preview. The original order of each channel set is shown to the left of the buttons. Use the reset button on the right to restore defaults.
If you only want to rotate the order within a single three-channel set, enable the “lock rotation” option above that set’s preview tiles.
This feature is easiest to use when only one multicolor image is present in PixInsight. The image is then automatically loaded into all channels, allowing you to assign the different channels.
4 Zoom & Full-Resolution Preview
[hide]
The right-hand pane shows a fast, low-resolution preview for fluid interaction. Use the mouse wheel or the buttons at the top to zoom in and out. For a full-resolution preview, first zoom in, then right-click inside the preview to switch to full-res mode.
When zoomed, pan the viewport with the left mouse button. The status bar at the bottom displays zoom level, preview size, and the X/Y coordinates, as well as the dimensions of the full-resolution image.
5 Cropping
[hide]
Define a crop region by dragging with the left mouse button. A blue rectangle appears while drawing and turns green when released.
Move the crop area by dragging inside it; resize it by dragging its edges. Use the radio buttons beneath the preview to switch between 16:9 and free aspect ratios.
6 Generating Stretched Images
[hide]
If your inputs are linear, you can apply an automatic stretch. A new image is generated and assigned to the current channel.
Match the image type (single-channel or multi-channel) to the original. New images receive the postfix _CD_stretched. If a filter postfix such as _R, _G, _B, _S, _H, or _O is present, it is preserved.
7 Midtones Transfer Function (MTF) and weights
[hide]
The individual weighting of each channel can be adjusted with the sliders. If the weighting is set to zero,
the image will not be taken into account.
The reset tool button allows for a quick reset.
In addition to per-channel weights, apply an intensity transformation to the final composite using the MTF
controls, mirroring PixInsight’s HistogramTransformation module. Use the reset tool button to restore
defaults.
With these features, you can easily generate a Foraxx palette.
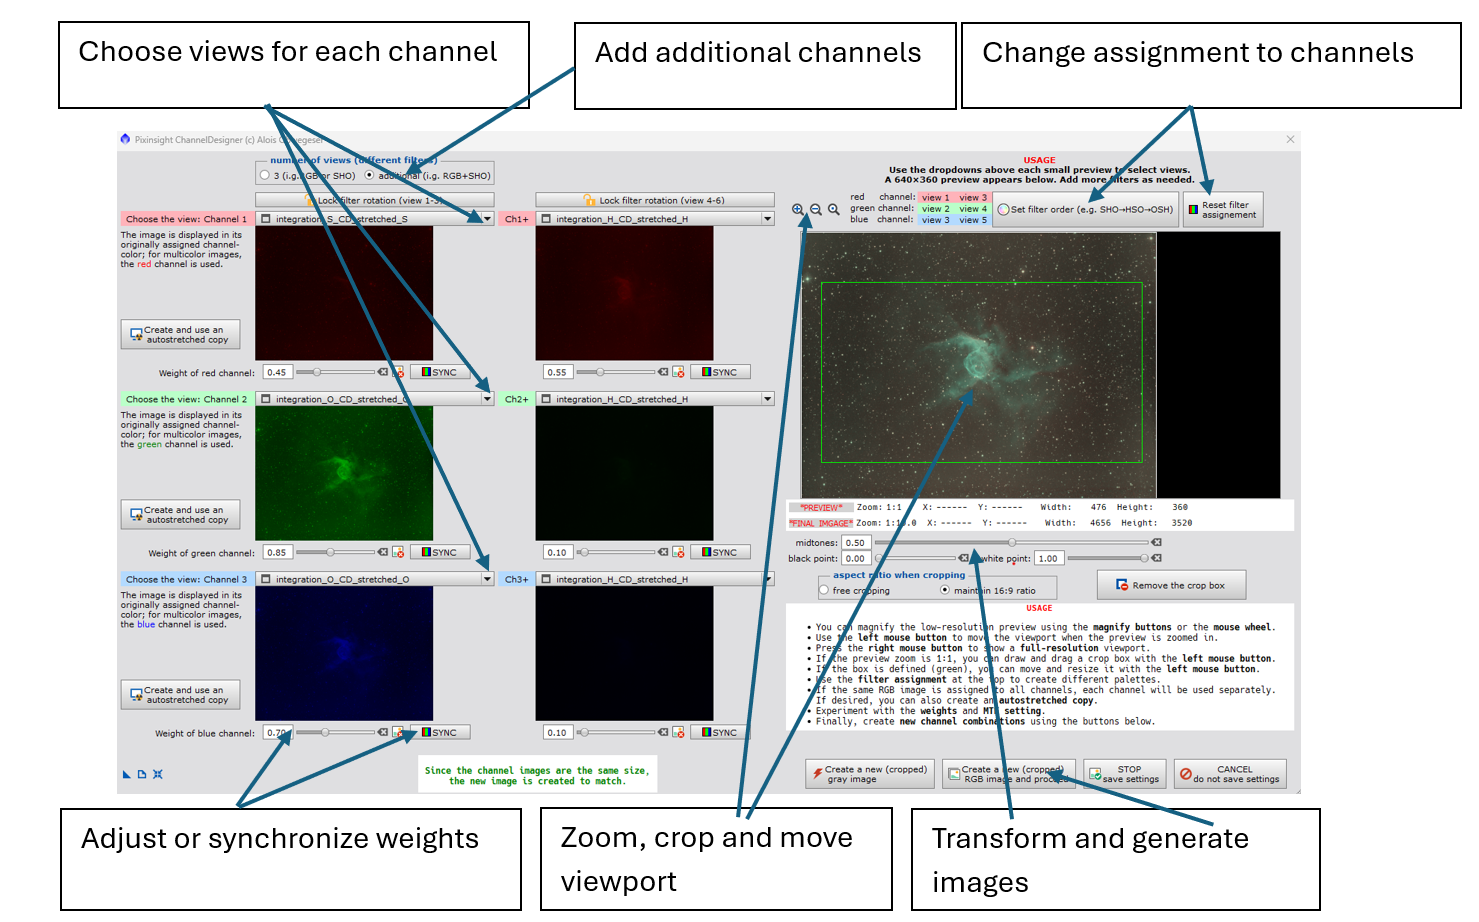
Foraxx example (weights):
first filter set: SOO
SII- filter view 1: weight = 0.45 >> SII contribution to Red
OIII-filter view 2: weight = 0.85 >> OIII contribution to Green
OIII-filter view 3: weight = 0.70 >> OIII contribution to Blue
second filter set: HHH
Ha- filter view 4: weight = 0.55 >> Ha contribution to Red
Ha- filter view 5: weight = 0.10 >> small Ha contribution to Green
Ha- filter view 6: weight = 0.10 >> small Ha contribution to Blue
Save the parameters as new instance to reuse it.
Foraxx formula:
R: rS*Sii + rH*Ha
G: gO*Oiii + gH*Ha
B: bO*Oiii + bH*Ha
8 Generating New Images
[hide]
- Create a grayscale image derived from all channels.
- Create a new RGB image.
If a crop rectangle is defined, it is applied to the generated image.